Since my favorite person in the whole world moved to Chattanooga recently, I decided to make a sign as a welcome gift. After going over several ideas about what to get her I decided a sign with her name on it would be appropriate.
I'm still not sure what she'll do with it but that's for her to decide not me. I'm exactly sure where I got the idea for burning wood. I do like to burn things though, so maybe that's part of it.
Anyway, after burning some test wood I decided it was worth the effort to make go for it. I figured that if I used aluminum foil to cover parts of the wood then it would sufficiently block the heat from the flame and leave the wood under the foil (did I mention that I like the word 'foil'?) and I was right.
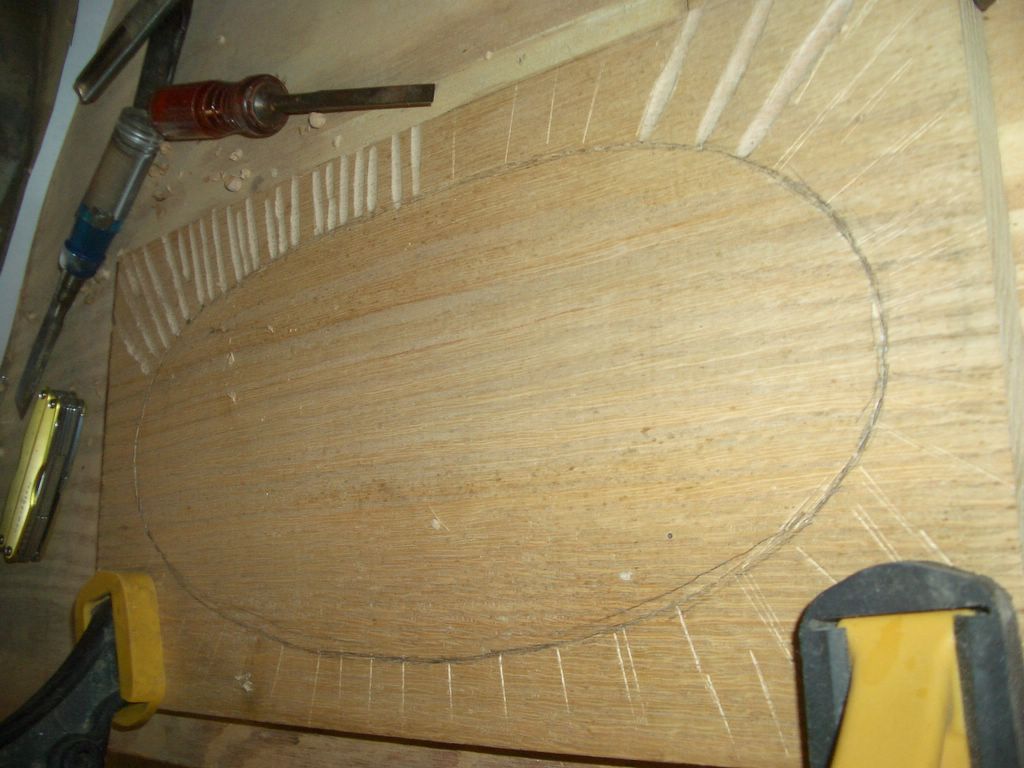
First I started with a beautiful looking piece of hardwood. After I cut it to the right size I drew an oval where I would put the name, 'Roxie'. If I would have been smart I would have used two small pieces of tape a sting and some simple mathematics to draw the oval, but I thought of this after I had a decent looking freehand oval, so I decided to stick with it.

The main purpose of the oval is provide some boundaries for the rays that would eventually encircle my girlfriends name. Next, I scored the oval and the rays, which radiate approximately perpendicular to the oval, with a chisel. My chiseled rays test on some pinewood was rather disastrous, but I felt confident that hardwood would work better. However, I was not completely convinced that it would not shed my board into chaos. After some searching I finally found a tool that would work better than the standard flat chisel that I had been using. The tool is actually designed to be used with a lathe but with its rounded edge, as opposed to the flat square chisel head, it worked better than I could have ever hoped. It made beautiful rounded grooves.

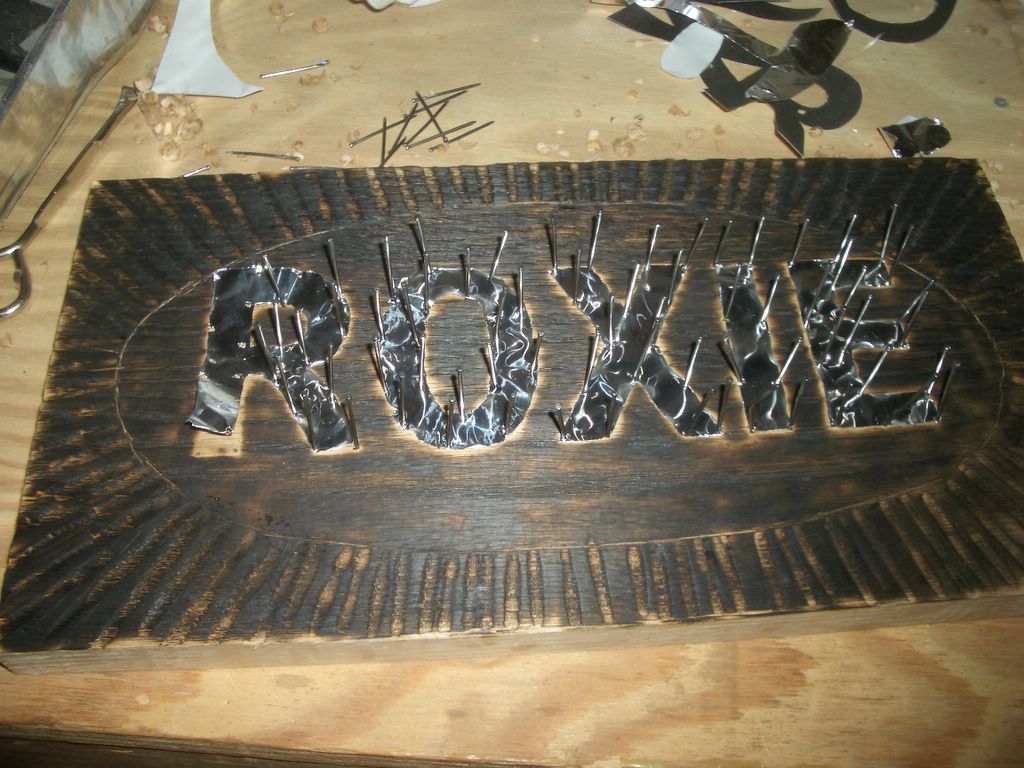
After this I printed "Roxie" in as big a font size as would fit a piece of paper. After backing with aluminum foil, I cut it to the size of my oval and taped it to the wood. I gently cut out the letters in the paper and aluminum foil with a hobby knife. Before I removed the excess aluminum foil I tacked each letter down to the wood in strategic spots with finishing nails. The result looked a lot like a pin cushion. I then very carefully removed the extra paper and foil, leaving only my aluminum letters tacked to the wood.
In my burn tests I used a candle with decent effects, however I needed something bigger and hotter to burn this much larger piece of wood. So I went to Lowes and bought a butane torch. It did the job without too much complaint. I did have to go back buy some more butane as I ran out before I was finished burning stuff. The torch worked rather well as it was much more focused then a candle and didn't create as much smoke. I was also please how well the foil did at keeping the wood beneath it from burning. After I removed all the nail and foil I stopped to examine how things were going.
I started to have some doubts. It looked very burnt. I couldn't see the rays at all and I started to think that it looked better as a pin cushion than a burnt piece of wood. But I didn't give up. I had tested enough of my theories to know better, there was still hope. I started sanding it by hand. I noticed some black dust begin to come off it, but still it was very black. I started to doubt again. Maybe I should use some power tools I thought. The first thing I tried was the detail sander. That went less then well.
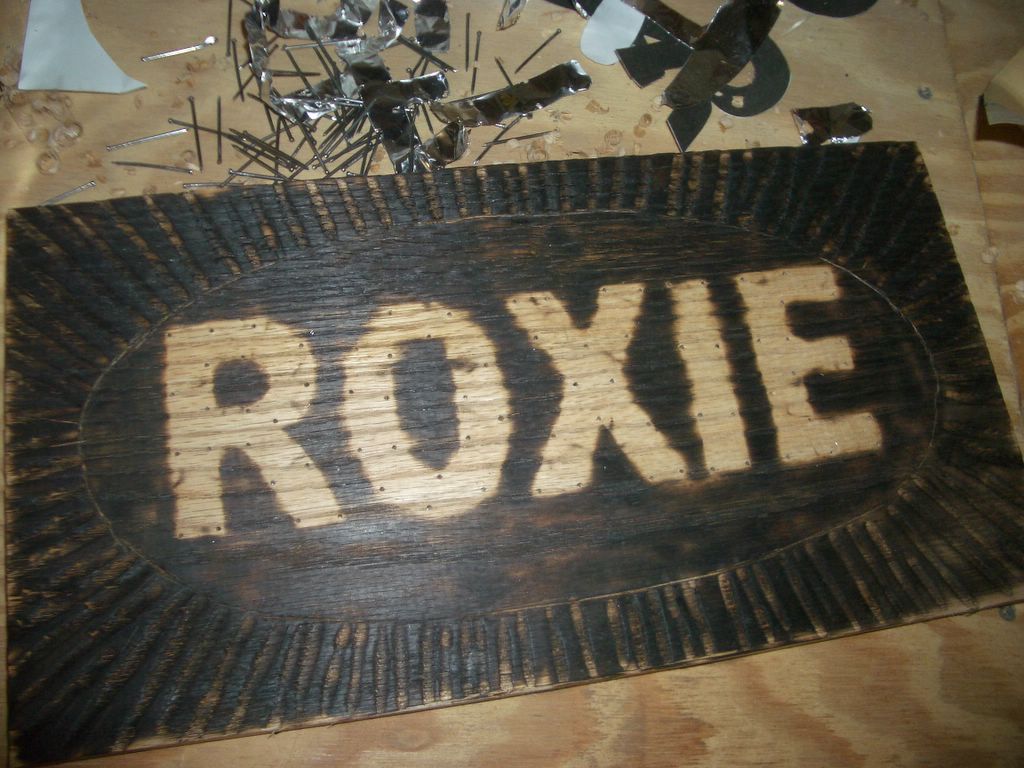
I remembered that we had a vibrating sander somewhere and after a little searching (like all workshops ours is a little bit of a mess) I found it. It worked a lot better. It began to take off the top layer of wood once again showing the beautiful hard wood. The plan all along was to burn the grooves and then sand away an black on the surface leaving mostly just the grooves burned. After a lot of sanding, and I mean a lot, it started to take the form of the idea that was in my head. I then decided that the letters definitely needed to be outlined in copper wire. I had played around with the idea before then but had actually decided to do it up until this point.
I figured that it would be cool to have the wire raised a little bit from the wood to give it a third dimension. This turned out to be a very good idea indeed. I decided that each letter would be anchored to the wood in two opposing corners to increase stability. Half of the wire holes I drilled with the drill press, the other half with a cordless drill. The cordless was actually easier to my surprise. I had previously bought some copper wire which Wildcard and I had stripped at Red Lobster. It took a lot of patients and a couple nights to get all the wires bent into the right shapes but with the help of my Leatherman, some small needle nose pliers, and my nimble fingers, I got them all bent into shapes that at least resemble letters.

After this I put two coats of spray on polyurethane on it. At first I was going to use some old brush on polyurethane that we had, but upon opening the can I found that it had a solidified layer on top of it. I broke though the layer but not before get polyurethane all over my hands. Needless to say, after I made a mess, I went out and bought some in a aerosol can.
As you can see I think it turned out well. Roxie seems to like it, and that's what matters most. I'm sure you probably didn't read this whole post but hopefully you looked at some of the pictures, and if you ever plan on burning some art maybe this post will help.
For more pictures go to my photoblog.
I love you Roxie.
Tags: wood working gift project art
1 comment:
You are so adorable.
I love you too.
sigh
Post a Comment